
I am so excited to show this quick little how-to that creates BIG impact! I've had the idea to do a wall display with plates for quite a while. When Tim and I were planning our wedding, I decided I wanted to ditch the paper dessert plates, and go with mis-matched china that we picked up at garage sales and thrift stores. We ended up with a lot of plates, some of which I used in this project. I love that I can use things from our wedding to decorate our home. You can use any plates from a collection you have, or have fun picking them up from flea markets, etc, like we did! You could even display other things besides plates.
Being the avid pinner that I am, I got inspiration from a couple photos I saw on Pinterest; these two in particular.
 |
| from www.brooklynlimestone.com |
 |
| originally pinned by Victoria McDonald |
So, I decided to create my own. I had been looking for a unique or retro kitchen clock to put up, and when my friend Sara started making home decor items with chalkboard paint and other fun items, I had the opportunity to get a one-of-a-kind clock creation from her! Her company is called Window 2 Wall Designs, and you can find her website here! Or, checkout her Facebook page here. Isn't this clock freaking rad!
 |
| you KNOW I can't resist yellow! :) |
1. Gather your supplies. Plates, sweet clock, hammer and nail (to hang the clock), and a roll of 3M indoor mounting tape (to hang the plates). Turns out I needed a pair of scissors too, to cut the tape. I chose to use the mounting tape rather than plate hooks or other options because I didn't want any hardware to show behind or around the plate. This tape holds up to two pounds. They're all sticking great so far!

2. Pick your wall, and hang up your first element. I chose to hang the biggest and most 'statement' type piece first. I wanted to highlight the clock.


4. Start taping and sticking. The plates were all different on the bottom and different weights. Most had a lip that stuck out from the flat part of the bottom. I made sure to get tape on that lip, since it was what would be against the wall.


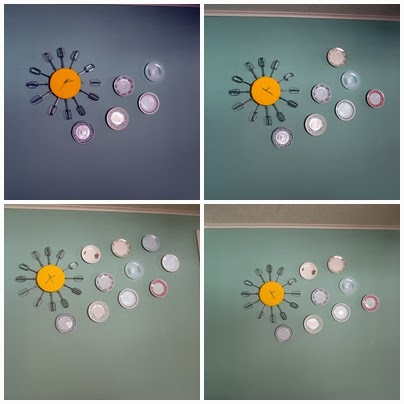 |
| progress clockwise from upper left |
6. Stand back and enjoy!


I am actually pretty impressed with myself! aaand, I have to give mad props to Ivy for being cooperative enough for me to get this done in one day! :)
I LOVE this!! Way to use your creativity! :)
ReplyDeleteThanks Mrs. B :)
Deletelove this kenzi! i do have extra mixer beaters!
Delete